1. Set Up Environment / Tools used in this tutorial:
1. Eclipse IDE for Enterprise Java Developers (version: 2019-06 (4.12.0)). You can download the latest version of Eclipse from here.2. Maven embedded in Eclipse (version: 3.6.1). You can install Maven in Eclipse by following this tutorial.
3. Spring Boot 2.1.8
4. Java SE 8
2. Spring Boot Hello World Example
To create a simple Spring Boot application, I will recommend using Spring Initializr https://start.spring.io . Fill the below details in the Spring Initializr1. Project : Maven Project
2. Language : Java
3. Spring Boot : 2.1.8
4. Project Metadata :
. Group : com.javahungry (Group represents the company name)
Artifact : SpringBootHelloWorld (Artifact represents the project name)
Fill the Project Metadata as shown below in the image :
5. Dependencies : I am creating a simple web application, for now. Write Web in the search box and then select Spring Web.
Note: You can select any dependencies like Security, JPA, Actuator etc. depending on the requirements of your project.
After selecting the dependencies then click on the green button "Generate the project". It will download the zip file. Extract the zip file into your workplace.
3. How to Import zip file to Eclipse
Next step is to import zip file to the IDE, here I have used Eclipse1. Import the Spring Boot project as an existing maven project. Go to File > Import > Maven. Select Existing Maven Projects as shown below. Click Next.
2. Select or Check the pom.xml file to import it. Click Finish.
3. SpringBootHelloWorld project will be imported. Dependencies mentioned in the pom.xml will be automatically downloaded and added into the classpath.
NOTE : Folder structure after importing the project shown in the below image :
Congratulations! You have successfully imported the Spring Boot application into your IDE. Let's understand what it has already configured for you.
4. Pom.xml
You will find below code in the pom.xml .<parent> <groupId>org.springframework.boot</groupId> <artifactId>spring-boot-starter-parent</artifactId> <version>2.1.8.RELEASE</version> <relativePath/> <!-- lookup parent from repository --> </parent>
Spring Boot provides various starters for creating Spring Boot based java application. The spring-boot-starter-parent is a special type of starter. It is used as a parent in the pom.xml file of any kind of Spring Boot application.
The spring-boot-starter-parent provides the common configurations such as plugin configuration, default java compiler level, dependency management, UTF-8 source encoding, etc.
There are other starters as well like spring-boot-starter-web for creating Spring web applications, spring-boot-starter-web-services is used for creating Spring web-services application.
5. Spring Boot Application Class
SpringBootHelloWorldApplication.javapackage com.javahungry; import org.springframework.boot.SpringApplication; import org.springframework.boot.autoconfigure.SpringBootApplication; @SpringBootApplication public class SpringBootHelloWorldApplication { public static void main(String[] args) { SpringApplication.run(SpringBootHelloWorldApplication.class, args); } }
@SpringBootApplication is equivalent to @Configuration, @ComponentScan and @EnableAutoConfiguration combined.
In other words :
@SpringBootApplication = @Configuration + @ComponentScan + @EnableAutoConfiguration
Let's understand about each annotation
@EnableAutoConfiguration : It tells Spring Boot to "guess" how you want to configure Spring, based on the jar dependencies that you have added.
For example, spring-boot-starter-web added Spring MVC and Tomcat, the auto-configuration assumes that you are developing a web application and sets up Spring accordingly.
@Configuration : It indicates that the class has @Bean definition methods by defining methods with the @Bean annotation. As a result, Spring container can process the class and produce Spring Beans to be used in the application
@ComponentScan : @ComponentScan without arguments indicates Spring to scan the current package and all of its sub-packages.
6. Create the Controller
Create a new Controller java class named HelloWorldController.java under package com.javahungry.controller. Add the following code into it.HelloWorldController.java
package com.javahungry.controller;

import org.springframework.web.bind.annotation.GetMapping;
import org.springframework.web.bind.annotation.RestController;

@RestController
public class HelloWorldController {

 @GetMapping(path="/")
 public String sayHello() {
  return "Hello!! from Java Hungry";
 }

}
7. Run Application
Run the SpringBootHelloWorldApplication.java by using the main() method or you can use the following command mvn spring-boot:run. After executing the main() method, your console will look like as shown below. Application by default will start the embedded tomcat server on port 8080.Now enter http://localhost:8080 in your browser and see the output.
Congratulations! You just run your first Spring Boot Application.
8. Execute SpringBootHelloWorldApplication through Command line
You will find the below code in the pom.xml.
<plugin>
 <groupId>org.springframework.boot</groupId>
 <artifactId>spring-boot-maven-plugin</artifactId>
</plugin>
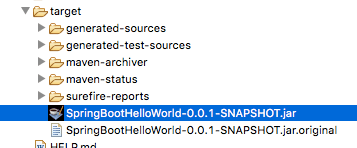
The above code packages your application into an executable jar file. You can use the following maven command to create an executable jar in the target folder.
mvn clean install
You can find the jar file in target folder as shown below :
Running Jar file from Command line / Terminal
Go to the target folder in the command line. Then, use the following command to execute the jar file
java -jar SpringBootHelloWorld-0.0.1-SNAPSHOT.jar
The application will start on port 8080 by default. Enter http://localhost:8080 in the browser to see the result.
That's all for the day. Please mention in comments if you have any questions related to article Spring Boot Hello World example step by step using maven and eclipse.
9. Download Source Code
Download – SpringBootHelloWorld.zip
References:
Spring docs
Component Scan


