Read Also : Java 8 Interview Questions and Answers
1. Configuration Mistake in Eclipse.ini file
You might have made a mistake while configuring Eclipse.ini file. You can find the eclipse.ini in the eclipse installation directory. You can open eclipse.ini using notepad in windows.
You need to add the following code just before the line that includes -vmargs in the eclipse.ini file.
-vm
C:\Program Files\Java\jdk1.7.0_40-64\bin\javaw.exe
C:\Program Files\Java\jdk1.7.0_40-64\bin\javaw.exe
The second line above i.e (C:\Program Files\Java\jdk1.7.0_40-64\bin\javaw.exe) may be different depending upon the java jdk version installed in your computer.If you have a 32 bit java jdk version , it may be found in Program Files(x86).
Important Rules for Specifying -vm option.
a. The -vm option and its value (the path) must be on separate lines.
b. The value must be the full absolute or relative path to the Java executable, not just to the Java home directory.
c. The -vm option must occur before the -vmargs option.
For more details you can check this out here.
Below is the screenshot of the working eclipse.ini configuration :
2. Different bit version :
There are two versions of bit version configuration (32bit or 64 bit). If you have installed 64 bit version of java jdk and 32 bit version of eclipse ide or vice versa , then you will get this error.
You will get rid of this error by just downloading the correct version of java jdk and eclipse ide.
How to Check the bit version configuration of Windows machine
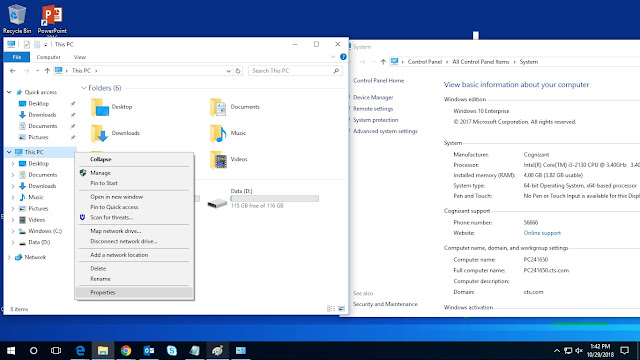
a. Open File Explorer by pressing WindowsKey + E
b. Right Click on "This PC" (My Computer).
c. Click on "Properties".
d. It will open another window, check "System Type" (in our case as shown in image, 64 bit Operating system).
Now, we come to know which bit version operating system we are using.
After knowing 64 bit version operating system, I need to install 64 bit version of Java jdk and 64 bit version of eclipse ide.
How to Check if Java is 64 bit or 32 bit
a. Press WindowsKey + R ( run window)
b. Type "cmd"
b. In the command prompt just type below command
java -d64 -version
it will give below error if java jdk version is 32 bit.
Error: This Java instance does not support a 64-bit JVM.
Please install the desired version.
Please install the desired version.
It will work fine if 64 bit version java jdk is installed. You will see similar message as shown below:
C:\>java -d64 -version
java version "1.8.0_181"
Java(TM) SE Runtime Environment (build 1.8.0_181-b25)
Java HotSpot(TM) 64-Bit Server VM (build 25.181-b25, mixed mode)
java version "1.8.0_181"
Java(TM) SE Runtime Environment (build 1.8.0_181-b25)
Java HotSpot(TM) 64-Bit Server VM (build 25.181-b25, mixed mode)
Most important point is to make sure there is no mismatch between the version of java jdk and eclipse ide.
In short you need to follow one of the three scenarios:
a. 32-bit OS , 32-bit JDK, 32-bit Eclipse (32-bit only)
b. 64-bit OS , 32-bit JDK, 32-bit Eclipse
c. 64-bit OS , 64-bit JDK, 64-bit Eclipse (64-bit only)
3. Environment Path Variable issue
By removing Environment Path variable, exit code=13 error may start working for some users.
Step by Step Guide For Finding Path Variable in Windows 10 or 8
a. Search for "System Variable".
b. Select "Edit the system environment variables" option
c. Click on "Advanced" tab
d. Click on "Environment Variables"
e. Select "Path", then click on "Edit"
If you are using another Windows Operating System (7,Vista, xp) or Linux or MacOS then you can find "Path" here .
After finding the "Path" you can follow below steps
Remove the entry i.e "C:\ProgramData\Oracle\Java\javapath;"
Restart the eclipse again.
4. Eclipse Installation Directory contains Special Characters like (#,@,!)
You might have special characters in eclipse installation directory. You have to make sure there is no special characters in the eclipse installation address.
Example :
Before fixing special character(in below case @)
C:\@IDE\eclipse4.6\
By removing the "@" special character from the path it will solve the problem.
C:\IDE\eclipse4.6\
5. Wrong version or Unsupported version of Java Virtual Machine
It may be possible that you are using unsupported java version with the latest eclipse version.Also, there are lot of compatibility issues with java jdk 1.8 and higher versions. So if you are not able to fix the error from the above methods, then try degrading jdk 1.8 to jdk 1.7 or lower version and check if error is fixed or not.6. If you have installed java 8 and uninstalled java 7. Then try to install Jdk 8 and retry.
Please mention in the comments below if you have fixed "java was started but returned exit code=13" error in eclipse and which method (from 1 to 6 above) has helped you.
References : Ashout and StackOverflow

